Msftconnecttest redirect error is a problem that occurs on computers running Windows operating systems such as Windows 10 and Windows server 2016/2019. Many users have reported that they cannot connect to the Internet due to redirection errors displayed on the screen. The redirect error most times gets stuck in a loop and prevents users from accessing the Internet.
The Msftconnecttest redirect error is observed chiefly when connecting to a public network requiring Hotspot Sign-in information or a corporate network that uses a proxy server to connect to the internet. It rarely occurs when connecting to a personal hotspot and WiFi networks. This article will explain how and why this error occurs, provide a deeper insight into its origin, and show you how to eliminate it.
How and Why the Error Occurs
When you connect a computer running Windows 10 or Windows server 2016/2019 to a public network that requires Hotspot Sign-in information such as those found in hotels, airports, and so forth; or to a corporate network that uses a proxy server to connect to the internet, you may notice that your default browser opens and could get redirected to msftconnecttest.com. Msftconnecttest.com is the website operated by Microsoft Windows computers to check if there’s Internet access.
So when users attempt to connect to a network, they get redirected to msftconnecttest and then to some other site like the MSN website. At the same time, the network icon on the Task Bar will show an alert symbol and say either “No connectivity” or “Limited Internet access”. Once users sign in to the network, they should be able to access the Internet. This is perfectly normal, and as stated by Microsoft, this behavior is by design.
According to Microsoft, “Windows uses the Network Location Awareness (NLA) service to detect the properties of a network and determine how to manage connections to that network. NLA uses the Network Connectivity Status Indicator (NCSI) component to determine whether the computer has successfully connected to the network and whether the network has intranet or internet connectivity. NCSI uses both active and passive probes. These probes are triggered by changes in any of the network interfaces.” When you attempt to connect your Windows PC to a network as described above, NCSI initiates the following process:
- Active probes and the network status alert
- Authentication and the automatic sign-in page
- Passive monitoring and the network status alert
In Windows 10 or later versions, the active probe process follows the steps itemized below:
- NCSI sends a DNS request to resolve the address of the www.msftconnecttest.com domain name.
- If NCSI receives a valid response from a DNS server, NCSI sends a plain HTTP GET request to https://ift.tt/3AI0gtQ.
- If NCSI successfully downloads the text file, it makes sure that the file contains Microsoft Connect Test.
- NCSI sends another DNS request to resolve the address of the dns.msftncsi.com domain name.
If any of these steps fails, the network alert appears in the Task Bar as earlier described. But if all of the requests succeed, the Task Bar shows the usual network icon that indicates Internet access. In addition, if user authentication is required to gain access to the network, Windows opens the default browser such as Internet Explorer or Edge with the sign-in page. This behavior was introduced to improve the Windows user experience, which was missing in earlier versions.
NCSI passive probe processes involve monitoring the network activity of other applications on the computer. This passive monitoring process continues even if the active probe process fails. NCSI alters its network status determination based on whether other applications can make successful TCP connections. A network alert appears because of a failed active probe, and it disappears when a passive search succeeds.
When you connect to a network that uses a proxy server to connect to the internet or when network restrictions prevent NCSI from completing its active probe process, Windows opens an HTTP connection https://ift.tt/3kzdIKO, that is followed by a redirected link to the MSN Portal. If the page loads, NCSI concludes that the computer has internet access. As the different probes fail and then succeed, the network status alert appears and then disappears.
The Windows operating system was designed to improve the user experience, which was missing in earlier versions. The connection test is performed by Windows probing msftconnecttest.com and ipv6.msftconnecttest.com domain names by downloading a file named connecttest.txt to verify Internet access and thus validate that everything is 100% functional. But some factors prevent the test from being carried out successfully. These factors include:
- Connection test failures
- HTTP / HTTPS configuration issues
This results in what we know as msftconnecttest redirect error, as shown in the screenshot below. Suppose you have a Windows machine connected to the Internet through a proxy that blocks some traffic based on user authentication. In that case, there may be a condition that causes this connection test to fail and continuously repeats itself.
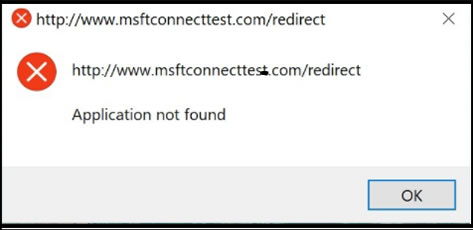
Msftconnecttest Redirect Malware
Malicious sites may sometimes imitate msftconnecttest and mislead unsuspecting users. For example, some malicious actors use msftconnecttest redirect error to redirect user traffic to malicious sites. Msftconnecttest redirect has been identified as a notorious computer infection that falls under the browser hijacker category—which redirects users to unknown domains where they had not intended to visit.
Msftconnecttest redirect malware can compromise any web browser, including Chrome, Firefox, Edge, Opera, and Safari, to target more and more users. At first, the malware attempts to make several unexpected modifications in your default browser’s settings in an attempt to gain complete control of your browser. However, once it takes hold of your browser, it starts flooding your screen with intrusive, annoying ads and pop-ups, redirecting your browsing activities to affiliated websites, dropping error messages, and tracking your online activities for malicious purposes.
The main motive of this browser hijacker is to collect pay-per-click revenues for the developers. Every time you click on these ads, you help generate profits for the owners via a cost-per-click mechanism. Other actions that the msftconnecttest redirect malware may perform on your system include:
- Replacement of your current browser home page, search engine, and new tab URL with its domain
- Install multiple browser helper objects (BHOs) on your browser to prevent the settings from being restored.
- Injection of tracking cookies on your browser to eavesdrop on your web activities and collect information regarding your interests
- Share your collected browsing activities and interests with advertisers who use the data to generate and display more targeted ads to get as many hits as possible to maximize revenues.
- Msftconnecttest redirect may lead you to phishing, scamming, and even malware-infected sites that are filled with malicious contents.
When you experience msftconnecttest redirect, it’s important to note the URL and make sure it’s the legitimate Windows msftconnecttest.com domain. For example, you could get redirected to a site that has a very similar address to msftconnecttest.com, with only a minor difference, such as msftconectest.com with one “n” and “t” instead of double “n” and “t”. Being redirected to this kind of site could indicate some sort of infection. When you encounter such situations, you need to scan your computer with anti-malware applications such as Malwarebytes or other similar tools to fix the problem.
How to fix Msftconnecttest redirect error
The following procedures outline some of the steps you can use to fix msftconnecttest redirect error.
1. Reset Your Browser: Follow the steps below to reset your Internet Explorer settings. If you are using a different browser, the steps are similar. Just locate where the same tabs are on your browser until you get to the Reset option.
- First, Close all windows on the screen and open the Internet Explorer.
- After opening Internet Explorer go to Tools and find Internet Options
- Choose the Advanced tabs
- When the Reset Internet Explorer Settings dialog box opens, click Reset.
- When the default settings get applied, choose Close and click OK.
- Finally, restart the PC
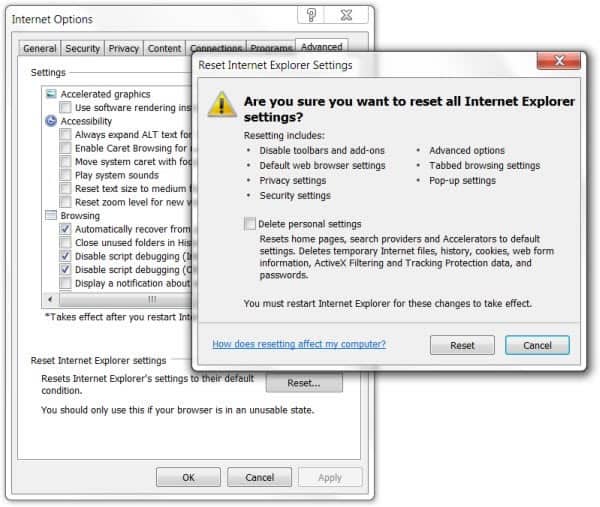
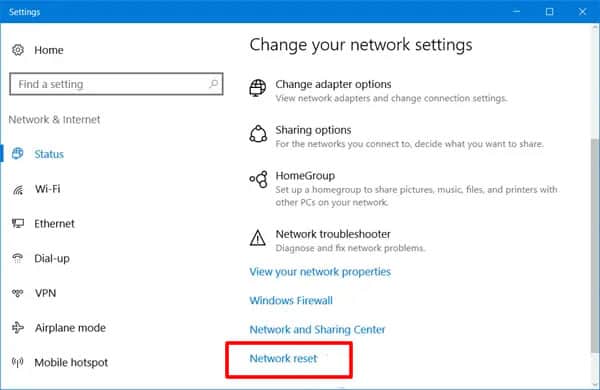
2. Reset the network adapter: Resetting the network can help prevent the error from happening. If the error has already occurred, this can be one of the best ways to remove it from your system. Follow the steps below in Windows 10 to reset the network:
- Click the Start button and then choose Settings to find Network and Internet
- Then click Status and Network Reset
- When the network reset screen opens, click reset now and Yes to confirm everything.
- Restart the PC
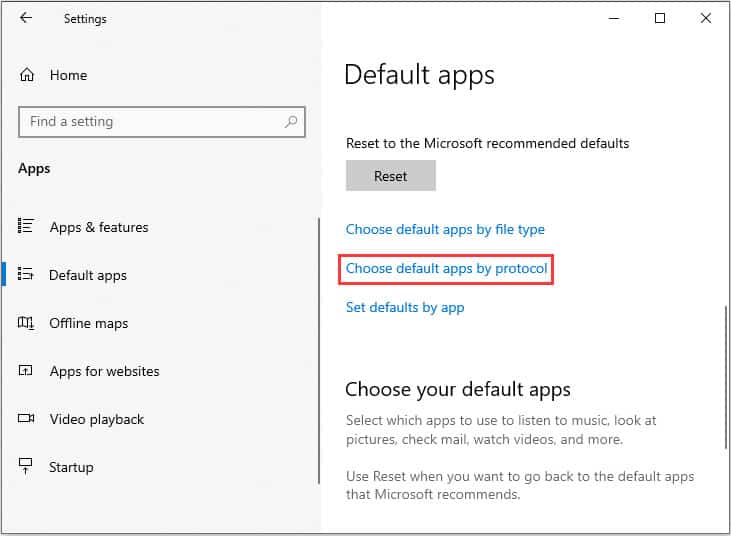
3. Edit the HTTP / HTTPS configuration: Follow the steps below in Windows 10 to edit the HTTP / HTTPS settings:
- Press the Windows key + I to open the settings
- Click on the Apps option and select the Default Apps from the left pane
- Select Choose Default Apps by Protocol option
- After that, Scroll down to click the Select a Default option for HTTP
- Then, choose your default browser from the list
- Close the windows and restart the PC.
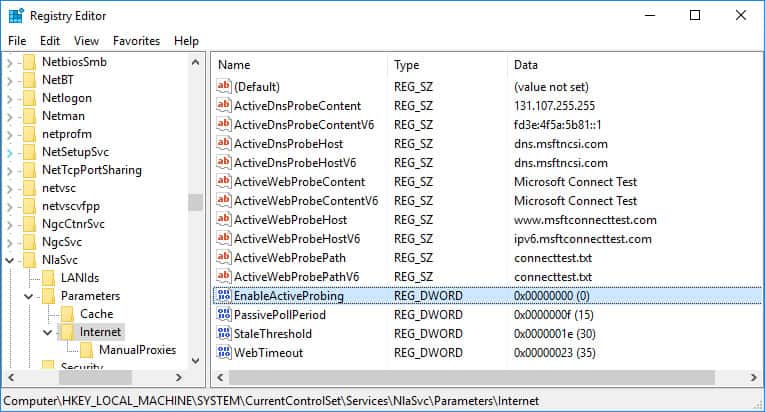
4. Disable connection test from the registry: If the computer has been configured to conduct a connection test every time an application tries to establish a connection, this error might be triggered. The easiest way to fix the repeated attempts to the connection test URL is to disable the NCSI active or passive probes. You can disable the NCSI active or passive probes using the registry or Group Policy Objects (GPOs).
Please note that Microsoft does not recommend disabling the NCSI probes. This is because several operating system components and applications rely on NCSI. For example, suppose NCSI does not function correctly. In that case, Microsoft Outlook may not connect to a mail server, or Windows may not download updates even if the computer is connected to the internet.
If you are comfortable with this process, follow the steps below to disable the NCSI active or passive probe in the registry:
- Go to search and type regedit, press Enter.
- Right-click on the Registry Editor and click Run as administrator
- Navigate to the following folder in the Registry Editor: HKEY_LOCAL_MACHINE\SYSTEM\CurrentControlSet\services\NlaSvc\Parameters\Internet
- Double-click on EnableActiveProbing to edit the value
- Change the Value data from 1 to 0
- The internet availability probing of msftconnecttest.com should stop immediately.
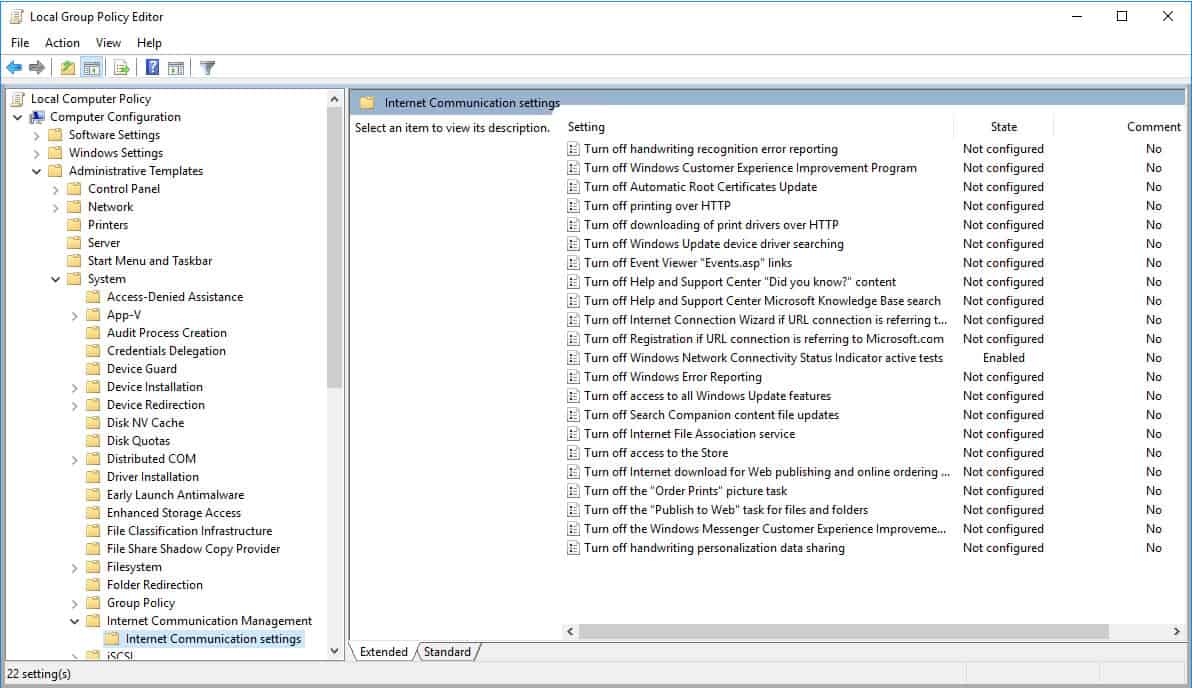
5. Disable connection test via Group Policy: You can also disable the internet connection test feature by editing the local group policy on your computer if it’s not part of a domain or through the group policy management console.
- Open group policy (gpedit.msc if not part of a domain)
- Navigate to Computer Configuration >> Administrative Templates >> System >> Internet Communication Management >> Internet Communication settings
- Change the setting Turn off Windows Network Connectivity Status Indicator functional tests to Enabled.
L’article How to Fix Msftconnecttest Redirect Error in 5 Steps est apparu en premier sur Comparitech.
0 Commentaires