If you’re looking for a fast and easy way to perform a bare-metal restore, you’re in the right place. This guide will look at precisely what bare metal restoration is and explore a few different recovery techniques.
What exactly is a bare-metal restore?
A bare-metal restore is when you recover a system directly on to piece of server hardware rather than restoring it to a virtual environment. In a bare-metal restore, the operating system is installed directly onto the server hardware.
This is the opposite of virtualized hosting, which uses ESXi or Hyper V programs that allow a single piece of hardware to host multiple operating systems or server environments. Since we aren’t dealing with virtualization, datastores, or containers, bare-metal restores are often considered less complicated to carry out.
To perform a bare-metal restore, we’ll need to use recovery software. In the first example, we’ll use N-able Backup to restore a Windows environment due to its simplicity and flexibility.
Restoring Bare Metal Environments With N-able Backup
To start, download N-able Backup. The software can be downloaded on either Mac OS, Linux, or Windows. Once downloaded, run the installer and log in with your credentials. You’ll see a few different options for recovery.
We’ll want to choose the Bare Metal option. But first, let’s review some requirements before getting started.
Step 1: Requirements
Before restoring your bare metal environment, review these source system requirements:
Your recovery environment is one of the following versions:
- Windows 7, 8, 8.1 and 10
- Windows Server 2008, 2008 R2, 2012, 2012 R2, 2016 and 2019
If your disk is using an MBR partition table, ensure its volume isn’t larger than 2TB.
Mixed MBR/GPT partitions on the same disk cannot be restored at once. Therefore, if your environment does use various partitions, recover only the boot partition during the bare metal recovery process.
Your recovery bare metal environment must be 64-bit capable, with the number of physical disks equal to exceeding the disks from the source environment.
Step 2: Create Your Bare Metal Recovery Media
Choose the Bare Metal option in the N-able Backup recovery panel. N-able supports recovery via USB and removable storage and CD, DVD, and virtual machines in ISO format. First, create either a USB drive and or a bootable CD/DVD.
Keep in mind, the USB drive will need to be formatted to boot to it, so ensure the USB is free of all other data.
Step 3: Booting To The Target Machine
Insert your recovery CD or thumb drive and boot to that device. The boot menu can be accessed on many servers by pressing ESC, F1, F2, F8, or F10 during the reboot process.
Make sure you boot into the same mode that is compatible with your recovery environment. For example, if your recovery environment uses UEFI, boot to UEFI on the bare metal system.
Find your bootable device and select it to launch the N-able Backup recovery software. You should see a command prompt with multiple options.
N-able Backup has a few different recovery options:
- Show adaptors – Detects and verifies the status and details of network adaptors on the bare metal host. This is useful when recovering from data on the LAN or in a device such as a NAS.
- Show current UP settings – Similar to running an “ipconfig” command. This will output the adaptors IPv4/6 address, DNS suffix, subnet mask, and gateway.
- Configure LAN – This allows you to change IP settings for different adaptors.
- Test network connection – Allows you to run a test to verify network connectivity.
- Start command prompt – Opens a command prompt. This allows you to run additional commands outside of the tool. This is useful for modifying host files or running utilities such as DiskPart.
- Repair boot settings – This process scans all disks for Windows installations and attempts to repair if boot issues are detected.
- Start keyboard layout selection – Allows you to select another language for your keyboard. Simply refresh the screen for your changes to take effect.
- Start VNC – Allows for remote VNC connections using the bare metal server’s IP address.
- Map network storage – This allows you to map a local path to a network resource where logs and backup details can be written. This is convenient for storing verbose logs during recovery and helps conserve memory. If additional drivers are needed on the restored system, those drivers can be accessed via mapped drives.
- Install additional drivers from network storage – This allows you to access and apply additional drivers stored on local network resources. Supported file formats are .inf and .sys.
Step 4: Enable Debugging (Optional)
If you wish to enable debugging, you can do by completing the following steps:
First, choose the “Start Command Prompt” options.
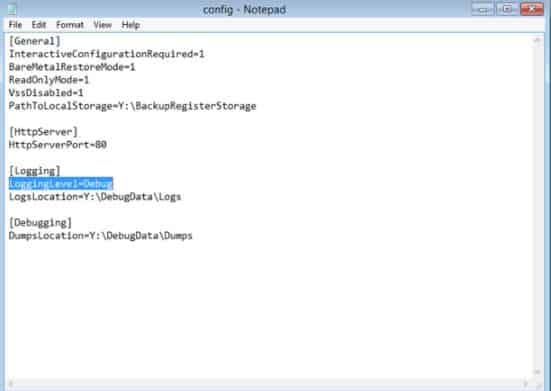
In the command prompt window, type “notepad ‘%programfiles%\Backup Manager\config.ini’”
Notepad will open with configuration options inside. Add the following two sections to the [Logging] section.
LoggingLevel=Debug
LogsLocation=Y:\DebugData\Logs
If there is no Logging section, simply create it in the notepad. Then, save the notepad file and close it.
Step 5: Configure Local Recovery & Backup
By default, N-able Backup can save a copy of your environment to the cloud. Alternatively, a copy can be saved locally using the LocalSpeedVault.
You can configure these settings if you wish to enable backups after recovering your bare metal environment (which is a good idea if you don’t have backups in place).
Open command prompt from the bare metal recovery tool.
- Type diskpart and press enter.
- Type list disk and press enter.
- Type select disk 0 and press enter.
- Type assign letter=R and press enter (R can be any drive letter not currently in use).
- Type exit and press enter.
Continue with the Bare Metal Recovery from the interface as standard.
Step 6: Recover From The Source System
Once your recovery settings are configured, press 0 to launch the recovery process. Choose your language and enter your backup device name, password, and security code. Click Next.
If you added a network path under the “map network storage” option, you’d be able to choose any additional drivers your recovery environment may need before restoration.
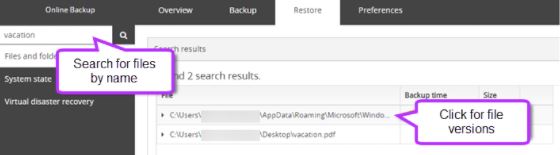
Under the Restore tab, you can navigate to your bare metal backup via the search function. The search feature can easily find your recovery environment and is not case-sensitive.
In place, restoration can be performed to the original location and is set this way by default. Choose this option if that data no longer exists or if you wish to overwrite the files. To overwrite the files, keep the “Restore to” field blank.
Alternatively, you can specify a new path to the target directory to keep files in the bare metal environment after restoration. You can also choose to let N-able Backup skip files that have not changed.
This process checks each file to ensure they match across both environments. This will help speed up the recovery time and reduce the number of resources needed during recovery.
Click Restore to begin the recovery process. Once the recovery is complete, shut down the machine, eject the USB and reboot the server.
Restoring Bare Metal Environments With Barracuda Backup
BarracudaMSP/Backup is an excellent option for providing disaster recovery as a service (DRaaS) and supports numerous multi-tenant options catering to MSPs. Below we’ll review how you can restore a bare metal server with BarracudaMSP.
Step 1: Requirements
Ensure that your recovery hardware and firmware match the same environment where your backups were taken from. This means BIOS and UEFI must also check across both instances.
BarracudaMSP can recover all modern Windows environments on bare metal except Windows 2016 and 2019 ReFS partitions.
Step 2: Create Your Bare Metal Recovery Kit
BarracudaMSP uses a recovery kit in the form of a bootable ISO file based on WinPE. This allows you to recover both physical to physical and physical to virtual bare metal restoration without installing the operating system.
Before building the ISO, you must install the Windows ADK and Window PE add-on. The scripts inside the Barracuda Backup use this to generate the ISO.
To install Windows ADK perform the following steps:
- Run adksetup.exe and choose “Install the Windows Assessment and Deployment Kit to this computer.” Click next.
- Accept the terms and conditions and keep the default settings.
To install Windows PE Add-on for ADK, perform the following:
- Run adkwinsetup.exe and choose “Install the Windows Assessment and Deployment Kit Windows Preinstallation Environment Add-ons using the default install path.”
- Accept the terms and conditions and click Next.
- Keep all settings default and click Install.
Step 3: Preparing Additional Drivers (Optional)
If the bare metal environment requires additional drivers that aren’t a part of Windows PE by default, you can include those drivers as a part of your recovery process.
To add additional drivers to Barracuda Backup:
- Create a single folder that contains all the drivers needed. Example: (C:\recovery-drivers).
- Download the drivers and extract them if they are in a compressed format such as ZIP.
- Ensure that your extracted drivers contain at least one INF to include in the recovery ISO.
- Copy the extracted drivers into the folder you created. (C:\recovery-drivers).
Step 4: Installing Barracuda Backup
Once those components are installed, download and install Barracuda Backup. Inside the program, navigate to System > Software Downloads > and choose Windows Bare Metal Recovery Kit.
In these next steps, we’ll build our recovery kit.
Unzip BarracudaBackupBmrKit-X.Y.ZZ.zip the file and make a note of where it is stored. Then, open a command prompt and navigate to the folder where you extracted the files.
Run the create_bmr_iso.bat script to build the ISO. This process supports both 64 and 32 bit systems. You can choose to build the ISO in each architecture with or without drivers. Choose one of the commands below that reflects your recovery method.
64-bit ISO without additional drivers: create_bmr_iso.bat amd64 C:\winpe-workspace C:\bmr.iso
64-bit ISO with additional drivers: create_bmr_iso.bat amd64 C:\winpe-workspace C:\bmr.iso C:\drivers-for-bmr
32-bit ISO without additional drivers: create_bmr_iso.bat x86 C:\winpe-workspace C:\bmr.iso
32-bit ISO with additional drivers: create_bmr_iso.bat x86 C:\winpe-workspace C:\bmr.iso C:\drivers-for-bmr
Step 5: Performing The Bare Metal Restore
Using the ISO you created, place the ISO on a freshly formatted USB drive. Insert the drive, access the boot menus, and choose to boot to the USB device.
After choosing the device, you should see the Barracuda Backup Agent menu. Click Next.
Under Network Configuration, choose Network Interface. Specify the IP address, subnet mask, and gateway, then click Next. If you do not see a network adapter, you can load additional network drivers to resolve the issue.
Choose whether you want to recover from Barracuda Cloud or a local backup under the Restore Browser section. Next, choose the system you want to restore from and click Restore to the right of it.

Under the Restore tab, you can choose to restore the environment to the same location or specify the IP address or hostname of the restore location. Once your settings are entered, click Restore.
After completion, you should see the results of the discovery process. This will include all of the volumes recovered, their size, type, and destination. Next, choose the volumes you want to restore and click Next.
You should see a window that displays the recovery status, the disk’s total size, and its throughput. While the program won’t give you an estimated recovery time, you can use these two metrics to gauge how long the recovery may take.
When the restoration is complete, click OK in the confirmation window. Next, remove the Barracuda Backup ISO from the system and reboot the machine. Finally, restart the machine and ensure your boot order is set to load your recovery drive first.
Conclusion
Disaster recovery is never fun, but it can make life a lot easier with the right tools. So what do you use to restore your bare metal environments? Let us know in the comments below.
L’article How To Perform A Bare Metal Restore FAST est apparu en premier sur Comparitech.


0 Commentaires