Google Chrome’s Incognito mode seems like a great way to keep your browsing habits private at first glance. However, the reality is that it only provides surface-level protection. Although your activities won’t show up in your browser history, they’re still logged by your operating system.
This criticism also applies to Microsoft Edge’s InPrivate mode, as well as Safari and Firefox’s Private Browsing, though for convenience, we’ll refer to these collectively as Incognito mode. Our goal is to clear up some common misconceptions about private tabs and explain exactly how they can (and can’t) protect your privacy.
This article will explain how to delete your browser’s incognito mode history and ensure that your internet activity remains private.
What is Incognito mode and how does it actually help you?
Anyone who’s ever shared a computer can tell you stories about embarrassing search results or address bar suggestions popping up at the worst possible time. Incognito mode aims to prevent this by deleting the following information when the window is closed:
- Sites visited during this private session (your regular browser history will not be cleared)
- All cookies saved during this session (which is why your login credentials aren’t saved between Incognito mode visits)
- Any images or web pages that were cached while in Incognito mode
So what does this mean for you?
In short, private browsing windows allow you to hide your online activities from other users on the same device. If it’s not possible for everyone to have their own account, and you don’t want to completely delete your browsing history, private windows are a decent solution.
What doesn’t Incognito mode do?
Private windows do not provide an impenetrable wall of protection. Quite the opposite, in fact.
Incognito mode prevents browsing data from being stored on your device, but doesn’t stop other third parties that you interact with on the internet from monitoring and tracking you.
Your internet traffic still has to be processed, which means that whoever runs the network you’re using (be it an employer, university, or public hotspot owner) can still see what you get up to online. Additionally, websites can still see your IP address, meaning they know roughly where you are and who your service provider is (though both of these problems can be prevented with a VPN). Divulging your IP address also identifies your device and allows it to be retargeted later.
Due to the nature of the internet, there are some privacy issues that can’t really be addressed with Incognito mode. A private window won’t stop website admins from monitoring which pages you visit, what you search for, how long you spend there, and what data you enter on forms, for instance. They also can’t stop you from sharing personally-identifiable information (though it’s good practice to avoid doing this regardless).
It’s important to remember that no software is 100 percent secure. Google allows logged-in users to view their browsing history online, and normally, this does not include any sites you’ve visited in Incognito mode. However, researchers have found that if you log into your Google account while in a private window, it is possible for websites that use Google services like AdSense to link your public and private personas (PDF).
How to view and delete your private browsing history
Unfortunately, while your browser might not store details of the sites you visit while Incognito, your operating system does. This is due to something called the DNS cache, which essentially keeps a record of how you were connected to recently-visited websites.
Here’s how to view and delete your private browsing history on Windows:
- Open an Incognito tab and visit a site you’d never normally use. In our example, we’ve used Pinterest
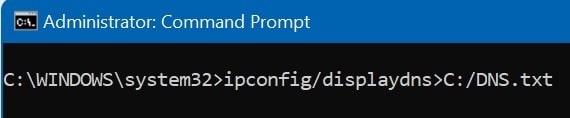
- Next, open the start menu, type “cmd” without quotation marks, then right-click the Command Prompt box and select “Run as administrator”
- There is a command that’ll let you see your DNS cache directly in the command prompt but we’ll be sending it to a new text file so you can take a better look at it. Type “ipconfig/displaydns>C:/DNS.text” (again, without quotes) and hit the Enter key
- Browse to your C: drive (File Explorer>Local Disk C:) and open the newly-created DNS.txt file
- Search for whichever site you visited in step one. It should appear, even though you were in Incognito mode at the time

- Now, go back to Command Prompt. This time, we’re going to clear the DNS cache. To do so, type “ipconfig/flushdns” (without quotes) and hit Enter
- Finally, press the Up arrow twice and press Enter again to refresh our DNS.txt file. When you open this file again, you should notice that the previously-visited site is absent. Best of all, this process accounts for all web traffic, so it doesn’t matter if you used Firefox, Chrome, or Edge: all recent DNS entries will be cleared
Note: It’s perfectly normal for there to still be entries in your DNS cache after clearing it. This is because ad-blockers, antivirus programs, and malware-scanners often tell your computer to reroute traffic from preset lists of shady websites.
Can I view my Incognito history on MacOS, iOS, and Android?
This problem isn’t exclusive to Windows, with every major operating system using a DNS cache. Follow the steps below to view and delete your private browsing history on any device:
MacOS
- Begin by opening a new Terminal (Go>Utilities>Terminal)
- Type “% sudo killall -INFO mDNSResponder >DNS.rtf” (without quotes)
- Locate the newly-created DNS.rtf file and open it with a text-editor; all recently-visited websites should be visible with a quick search of the document
- Return to the terminal and enter “sudo killall -HUP mDNSResponder” without quotes to kill the DNS management process and clear your DNS cache
iOS and Android (Chrome)
- First, open up Google Chrome and enter “chrome://net-internals/#DNS” into the address bar
- Previously, your DNS cache entries would be displayed here. These are still created but aren’t accessible without a few more steps. Now, you have to enable Chrome’s logging feature by clicking the chrome://net-export link then hitting the Start Logging to Disk button
- Open a new tab and browse to a website you don’t normally use
- Go back to the previous tab, make a note of the output file, and click Stop Logging
- Click on Email Log and sent the file to yourself
- Open the log file in a text program like Notepad – there’ll be a lot of data here but if you search for the site you visited earlier, it should appear
- On your mobile device, go back to “chrome://net-internals/#DNS”, click DNS on the left-hand side, then click Clear host cache to delete any DNS cache entries
Can I stop websites from being stored in my DNS cache?
There are a couple of ways to prevent your browsing history from being shown in the DNS cache. The first is to completely disable this feature, which could mean slightly longer loading times on websites you use frequently. Here’s how to turn off the DNS cache entirely in Windows:
- Press the Windows key and type “run” without quotes, then click the Run box
- Type in “msconfig” (without quotation marks) and press Enter
- Move across to the Services tab
- Click the Service heading to sort all services alphabetically. Now, scroll down until you see “DNS Client”
- Click the tick to the left-hand side, then click Apply
Alternatively, if you’re a Firefox user, you can turn on its DNS over HTTPS feature. This stops snoopers from monitoring your DNS requests and breaks DNS-based web-filtering, plus it ensures that the sites you visit aren’t logged in the DNS cache. To activate DNS over HTTPS, just follow these steps:
- Open Firefox and click the three-bars in the top right to open the menu
- Click Settings then scroll all the way down to Network Settings
- Click the Settings button and make sure that the “Enable DNS over HTTPS” box is checked
- Hit the OK button and restart Firefox to apply the change
L’article How to Delete Your Browser’s Incognito Mode History est apparu en premier sur Comparitech.


0 Commentaires