Windows Remote Management (WinRM) is the Microsoft implementation of Web Services-Management (WS-Management) protocol that provides a common way for systems (hardware and operating systems) from different vendors, to interact to access and exchange management information across an IT infrastructure.
WinRM is an important and useful protocol, especially for Network Administrators managing large windows network infrastructure.
Microsoft started implementing the WS-Management standard when it released WinRM 1.1, available for Windows XP, Windows Server 2003, Windows Vista, and Windows Server 2008. This was followed by WinRM 2.0 found in Windows 7 and Windows Server 2008 R2, which allows PowerShell 2.0 scripts and cmdlets to be invoked on a remote machine or a large set of remote machines. The latest version of Windows Remote Management—WinRM 3.0 was released in 2012 and comes pre-installed out of the box in Windows 8 and Windows Server 2012.
Why is the WinRM protocol important?
Why is the WinRM protocol important and why do we need it? With WinRM protocol, the connection between computers or servers can be easily established, so that remote operations can be performed. You can obtain data or manage resources on remote computers as well as the local computer. Connecting to a remote computer in a Windows Remote Management script is very similar to making a local connection. The WinRM protocol is intended to improve hardware management in a network environment with various devices running a variety of operating systems.
As a command-line tool, WinRM is built into Windows operating systems and based on .NET and PowerShell, which allows scripts and remote PowerShell commands to be invoked on Windows-based machines or a large set of remote machines without RDP or log into the remote machine. This method makes it easier for Windows Administrators to manage multiple machines using scripts and cmdlet, and perform tasks such as:
- Monitor, manage and configure servers, operating systems, and client machines from a remote location.
- Remotely communicate and interface with hosts through readily available channels/ports within your network, including workstations, servers, and any operating system that supports it.
- Execute commands remotely on systems that you are not local to you but are network accessible
The Windows Remote Shell (WinRS) command-line tool relies on WinRM to execute remote commands. It leverages WinRM to let you launch processes on remote machines. WinRM is the server component of this remote management application and WinRS is the client component for WinRM, which runs on the remote computer attempting to remotely manage the WinRM server. However, both computers must have WinRM installed and enabled on them for WinRS to work and retrieve information from the remote system.
WinRM architecture and components
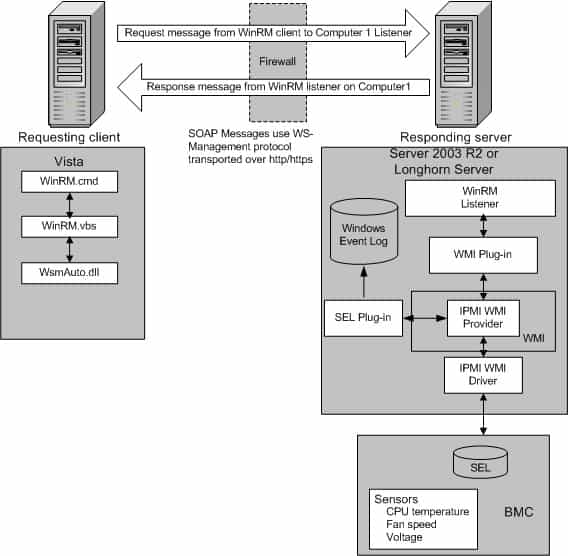
The WinRM architecture consists of components on the client and server computers. The diagram in Figure 1.0 below shows the components on both the requesting client and responding server computers, and how they interact with each other, including the protocol that is used to communicate between them.

Table 1.0 below is a breakdown of the various WinRM components and where they reside.
| Component | Description | Residence |
|---|---|---|
| WinRM application | WinRM command-line tool that uses the WinRM scripting API to make calls to request data or to execute methods | Client-side |
| WSMAuto.dll | The Automation layer that provides scripting support | Client and server-side |
| WsmCL.dl | API layer within the OS | Client and server-side |
| HTTP API | Provides support for HTTP and HTTPS transport | Client and server-side |
| WsmSvc.dll | WinRM listener service | Server-side |
| WsmProv.dll | Provider subsystem | Server-side |
| WsmRes.dll | Resource file | Server-side |
| WsmWmiPl.dll | WMI plug-in that allows you to obtain WMI data through WinRM | Server-side |
| IPMI driver and WMI IPMI provider | Supply any hardware data that is requested using the IPMI (Intelligent Platform Management Interface) classes | Server-side |
Table 1.0 | WinRM components and description
WinRM configuration and commands
For the WinRM command-line tool and scripts to run, and perform data operations effectively, Windows Remote Management (WinRM) must be installed and configured. However, the good news is that WinRM is automatically installed with all currently-supported versions of the Windows operating system, including IPMI (Intelligent Platform Management Interface) WMI (Windows Management Instrumentation) provider components.
By default, WinRM is enabled on Windows Server OS since Windows Server 2012, but not on Windows 10 operating system. This means that you need to enable it on Windows 10 machines. To enable WinRM on a Windows 10 machine, open PowerShell and run the following cmdlet:
Enable-PSRemoting -force
If you have a single Windows 10 machine that is not part of an Active Directory domain network, you may need to add the machine you are going to connect from to the trusted host of the Windows 10 machine. The reason we need to add trusted hosts is to be able to connect to a Windows machine using WinRM.
However, in situations where you have 100+ Windows 10 machines in an Active Directory domain network, you may need to use a Group Policy (GPO) to get it working with minimal effort. To use a GPO, create a new one or edit an existing one and modify the following settings and set WinRM to “Enabled”:
- Computer Configuration > Policies > Administrative Templates > Windows Components > Windows Remote Management (WinRM) > WinRM Service > Allow remote server management through WinRM
Remember to apply the GPO to the Organizational Units (OU) that have all your Windows 10 machines. Within a few minutes after applying the GPO to the OU, all your hosts will get the policy update. In this case, there is no need to modify the trusted hosts’ list.
The table below is a collection of some WinRM commands you can use to execute remote operations. Please note that these commands work best when you are on an Active Directory domain network. For workgroup machines, the WinRM service may require additional configuration such as modifying the trusted hosts’ list.
| Description | Command | Remark |
|---|---|---|
| Locate listeners and the addresses | winrm e winrm/config/listener | |
| Check the state of configuration settings | winrm get winrm/config | |
| Quickly configure the WS-Man service | winrm QuickConfig | Run from an Elevated Command prompt |
| Quickly delete the WS-Man listener | winrm invoke Restore winrm/Config @{} | Run from an Elevated Command prompt |
| Display your machine’s basic hardware info | winrm enumerate wmicimv2/Win32_ComputerSystem | Run from an Elevated Command prompt |
| Display your operating system properties | winrm get wmicimv2/Win32_OperatingSystem | Run from an Elevated Command prompt |
| Output your OS info in XML | winrm get wmicimv2/Win32_OperatingSystem -format:pretty | Run from an Elevated Command prompt |
Test WS-Man access to a remote machine |
winrm id -remote: | Run from an Elevated Command prompt |
| Grab a remote machine’s WS-Man config | winrm get winrm/Config -r: | Run from an Elevated Command prompt |
| Grab a remote machine’s CPU load | winrm g wmicimv2/Win32_Processor?DeviceID=CPU0 -fragment:LoadPercentage -r: | Run from an Elevated Command prompt |
| Grab a remote machine’s free memory | winrm g wmicimv2/Win32_OperatingSystem -fragment:FreePhysicalMemory -r: | Run from an Elevated Command prompt |
| Stop a service on a remote machine | winrm invoke stopservice wmicimv2/Win32_Service?name=w32time -r: | Run from an Elevated Command prompt |
| Start a service on a remote machine | winrm invoke startservice wmicimv2/Win32_Service?name=w32time -r: | Run from an Elevated Command prompt |
| Reboot a remote machine | winrm invoke reboot wmicimv2/Win32_OperatingSystem -r: | Run from an Elevated Command prompt |
| Run a command on a remote machine (this uses winrS, not winrM) | winrs -r: ipconfig /all | Run from an Elevated Command prompt |
| Use PowerShell to grab the WS-Man Win32_OperatingSystem XML output | [xml]$osInfo = winrm get wmicimv2/Win32_OperatingSystem /format:pretty | Run from PowerShell |
| Display the OS version property | $osInfo.Win32_OperatingSystem.Version | Run from PowerShell |
| Display the last boot time | $osInfo.Win32_OperatingSystem.LastBootupTime.DateTime | Run from PowerShell |
| Put free memory metric into an XML variable | [xml]$freemem = cmd /c “winrm get wmicimv2/Win32_OperatingSystem -fragment:FreePhysicalMemory -f:pretty -r:” | Run from PowerShell |
| Display the free memory value | $freemem.XMLFragment.FreePhysicalMemory |
Run from PowerShell |
Table 2.0 | Common WinRM commands and description
WinRM security
By default, WinRM uses Kerberos for authentication. This means that Windows never sends the actual credentials to the system requesting validation instead of relying on features such as hashing and tickets to connect.
WinRM listens on TCP port 80 (HTTP) by default, it doesn’t mean traffic is unencrypted. Traffic by default is only accepted by WinRM when it is encrypted using the Negotiate or Kerberos SSP. WinRM also includes helper code that lets the WinRM listener share port 80 with the Microsoft IIS web server or any other application that may need to use that port. Although WinRM listeners can be configured to encrypt all communications using HTTPS, with the use of Kerberos, even if unencrypted HTTP is used, all communication is still encrypted using a symmetric 256-bit key after the authentication phase completes.
You can manually configure WinRM to use HTTPS. The purpose of configuring WinRM for HTTPS is to encrypt the data being sent across the network. This allows for additional security by ensuring server identity via SSL/TLS certificates thereby preventing an attacker from impersonating it. To configure WinRM to use HTTPS, a local computer Server Authentication certificate with a CNAME matching the hostname is required to be installed. To install certificates for the local computer, follow the steps below:
- Select Start and then select Run (or using keyboard combination press Windows key+R)
- Type MMC and then press Enter
- Select File from menu options and then select Add or Remove Snap-ins
- Select Certificates and select Add
- Go through the wizard selecting the Computer account
- Install or view the certificates under Certificates (Local computer) >> Personal >> Certificates.
Once the certificate is successfully installed, use the following command to configure WRM to listen on HTTPS: winrm quickconfig -transport:https
Notable applications of WinRM
- SolarWinds Server & Application Monitor software (SAM) enables remote access for PowerShell with WinRM. It utilizes a WinRM server on monitored servers for its PowerShell integration.
- Thycotic Secret Server—privileged access management (PAM) solution, relies on WinRM components to run PowerShell scripts.
- Ansible—an agentless open-source software provisioning and deployment tool, leverages WinRM to communicate with Windows servers and run PowerShell scripts and commands. Ansible is agentless because of its ability to remotely connect via WinRM, thereby allowing remote PowerShell execution to do its tasks.
- CloudBolt—a hybrid cloud management platform, leverages WinRM as part of Blueprints, Server Actions, and CB Plugins to execute remote scripts on Windows servers using the python pywinrm module.
L’article Windows Remote Management (WinRM) Guide est apparu en premier sur Comparitech.

0 Commentaires